Positioning Pointers From the Pros

Share:

Orthopedic surgeons offer their top tips for optimizing access during hip, knee and shoulder procedures.


Per patient positioning prevents poor performance. “One of my mentors told me that, and I’ll never forget it,” says surgeon Gabe Horneff, MD, a shoulder specialist at the Rothman Orthopaedic Institute in Philadelphia, Pa. The self-described “stickler” for making sure patients are placed just so before surgery has been known to ask the surgical team to start the positioning process over if proper alignment is off by even a hair. It’s that important to him.

“Good access starts at the skin incision,” says Dr. Horneff. “If you don’t have it there, you’re going to regret that you didn’t position patients properly as you go deeper into the joint.”

Your surgeons likely share Dr. Horneff’s passion for positioning, so let’s look at effective ways to give them the joint access they want and need at the hip, knee and shoulder — all the while keeping patients safe.

Hips

There’s some debate over whether the anterior or posterior approach is best for total hips, but there’s no doubt patient positioning is critically important for both.

  • Posterior. Patients are positioned on their sides in the lateral decubitus position. Pegboards — a flat surface roughly the size of an OR table with dozens of tiny peg holes spread throughout — are simple devices that attach directly to a standard OR table and offer surgeons the ability to position and stabilize a variety of different-sized patients in the lateral position.

After patients are anesthetized, they’re rolled onto their sides and the pegs are strategically placed to ensure stability and proper positioning. For example, anterior pegs are placed near the pubic region and directly below the pectoral muscle. Posterior pegs go near the scapula, as well as in the lumbar and sacral areas. Padding is used to cover the area where the patient lays.

“The leg profile pegs let me move the hip in a variety of different positions during the surgery, so I can make sure it’s still stable inside the socket,” says Mitchell C. Weiser, MD, the fellowship director of adult reconstruction at Montefiore Health System in Bronx, N.Y.

When placing patients in the lateral position, pay close attention to how much stress you place on the sciatic nerve and avoid flexing the hip. The lateral position also compresses the axillary nerve. Placing an axillary roll beneath the patient’s ribs relieves pressure near the nerve, says Dr. Weiser. He also says skin pressure ulcers can occur around the greater trochanter and the head of the fibula, and suggests applying plenty of padding in those areas.

  • Anterior. With patients in the supine position, be aware of the pressure that’s applied on both the sciatic and femoral nerves. Positioning patients to give surgeons clear access is particularly critical during this approach, as hip instruments are moving around the femoral artery.
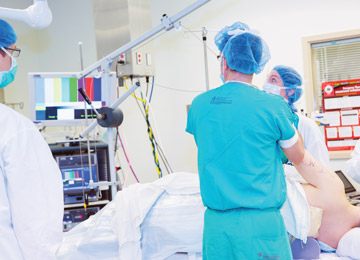
SIDE VIEW Placing patients in the lateral position for shoulder surgery allows for secure arm traction and clear visualization of the joint space.   |  Pamela Bevelhymer, RN, BSN, CNOR

Consider investing in a specialized traction table that lets surgeons perform a single-incision total hip procedure from the front of the joint — as opposed to the side or back — without detaching muscle from the pelvis or femur.

Michael Bates, MD, an orthopedic surgeon with OrthoCarolina University in Charlotte, N.C., uses a traction table that lets him position patients for total hips without the help of an assistant. The table’s traction device positions patients so their legs can move independently of one another. It also features a femoral lift system that secures the hip and gives him access to the femur.

“It’s a 6-figure investment, but well worth it for the positioning consistency it provides,” says Dr. Bates. “I can use the table to put the leg at 60 degrees of external rotation and do 2 turns of traction. I can’t get that type of precision when working with an assistant. All I can say is ‘pull harder’ or ‘pull less hard.’”

Patient size can be a factor in giving surgeons the access they need to the hip joint. “With larger patients, the abdominal pannus can fall over the thigh and obstruct your view,” says Michael Archdeacon, MD, the medical director of operative services at the University of Cincinnati Medical Center in Ohio. He proposes a simple fix: Use about 8 strips of 4-inch tape to pull the fold out of the surgical field and secure it to a large surface area.

Knees

Total knee patients are generally placed in the supine position, their knees flexed at about 90 degrees with a maximum amount of flexibility.

Dr. Bates relies on a lateral post and foot bump positioner to perfect knee positioning. It’s a simple attachment that mounts directly to the OR table and provides stability at the joint and foot padding, which is essential for preventing pressure injuries.

When using this positioning technique, “Avoid putting too much pressure on the perineal nerve at the fibular neck by leaning on it or pushing it against the post,” says Dr. Archdeacon.

There are plenty of other simple positioning devices that can be used for total knees, such as femur and tibia triangles, which fit directly under the knee to form a triangle when the knee is properly bent and the foot is resting on the table.

While the feet are resting firmly on the table during total knee replacements, surgeons often have the leg hanging off the table’s edge during arthroscopic procedures. “Surgeons are always moving and repositioning the leg to look behind corners in the joint,” says Dr. Bates.

Although more leg flexibility is needed during arthroscopies, you still want to keep the thigh stable. There are a number of positioning aids you can attach to a standard OR table to achieve that goal.

Shoulders
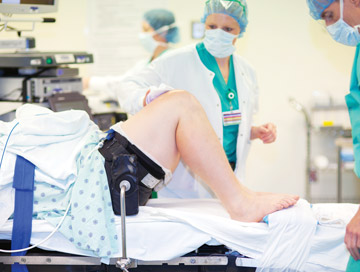
HOLDING STEADY Surgeons need to be able to move the knee around during arthroscopic procedures in order to access various parts of the joint, but a positioning device should be used to keep the thigh stable throughout surgery.

Patients are placed laterally or in the beach chair position for most shoulder procedures. “Both require surgeons to have access to the front and back of the joint as they’re maneuvering scopes and instruments,” says Rothman’s Dr. Horneff.

To gain the 360-degree access needed during arthroscopies, surgeons place multiple portal sites posteriorly, anteriorly and laterally.

“The posterior portal is the main access point,” says Edward Westerheide, MD, of Orthopedic Specialists & Sports Medicine in Newark, Ohio.

Dr. Horneff says seeing and working in and around the shoulder capsule can prove challenging. “We have specialized cameras with a bit of angulation, which helps visualization,” he explains, “but we’re also [manipulating instruments] through an anterior portal. That’s why it’s important to have unimpeded access at the front of the joint.” That can be tricky, depending on how the patient is positioned, says Dr. Westerheide. “As you’re maneuvering instruments, they can butt up against the patient’s head,” he explains. To prevent this, Dr. Westerheide places the head in a forward-leaning position, making sure the cervical spine isn’t flexed forward.

There are a number of different shoulder tables available that give your surgeons extra precision and access. “Most of the good tables have a hydraulic-assist component,” says Dr. Westerheide. “Instead of having to manually lift up the table while keeping the patient’s head stable, a spring-elevated lever does a lot of the work for you.”

The shoulder table Dr. Westerheide uses also has a hydraulic positioning component that locks the patient’s arm in whatever position he chooses. “You step on a pedal and place the arm where you want it, then simply step off the pedal to lock the arm in place,” he explains. That easy maneuverability lets him easily set forward flex and abduction of the joint.

Dr. Horneff says that during open procedures, such as shoulder replacements, surgeons establish access with an anterior incision and must be able to move the patient’s arm freely in space without worrying about the surgical table impeding the motion.

The most challenging aspects of performing a shoulder replacement involves accessing and viewing the glenoid, according to Dr. Horneff. Pneumatic or mechanical arm holders let him position the arm in various positions to help him achieve both goals. “To access the glenoid, you bring the patient’s arm up in an external rotation with abduction to help the humerus fall [away from the field],” comments Dr. Horneff. “Arm positioning aids make that so much easier to do.” OSM

Related Articles